Video Transcription
-
This is the same text as in the video. You may want to read it if you want go through the tutorial step by step.
- Introduction
-
 In this quickstart tutorial, I want to show you how to use Sundog to build a song. Including chords, bassline, and melody.
Sundog is not based on AI. It's more like a specialized songwriting solution that makes it easy to craft your own chord progressions, melodies, etc.
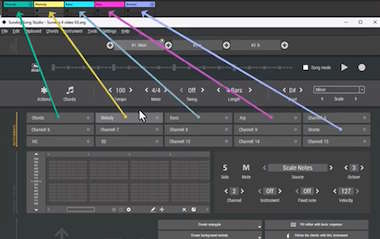
Sundog is a standalone software, and you can connect it to any DAW or synth to create your melodies. In this tutorial, I use a virtual MIDI cable to connect Sundog to Ableton Live. Different Sundog channels are connected to different Ableton channels via MIDI.
Sundog contains many tools to create basslines, arpeggios, and melodies very quickly. I will show you these tools later on, but first, let's take a look at the basic concepts.
- Step 1: Root and scale
-
First, we pick a root note and a scale. Sundog will use this information to make sure that your chords and melodies always stay harmonic.
- Step 2: Melodies
-
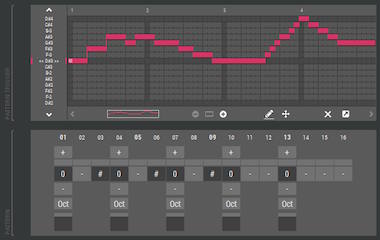 Pick one of the instrument boxes, then click on "Fill editor with basic sequence". Sundog will create a red line in the Pattern Trigger Editor.
The box above will trigger the pattern below. You can draw lines to control the pitch of the pattern.
Click on a pattern slot to add a note. And click twice to add a stop symbol ("#"). You can also drag and drop steps around. Hold down Control to create a copy.
Sundog includes a big list of factory patterns. Click on "Pattern" and you will see them.
You can click on items to hear a preview - and click a second time to stop.
- Step 3: Drums
-
Let's continue with the drum kit. According to the MIDI standard the MIDI channel 10 is reserved for drums.
Once again, click on "Fill editor with basic sequence". Then click on "Fixed note" and choose a bassdrum.
I will do the same for the hihats and the snare.
- Step 4: Chord progressions
-
Let's take a look at the chords now. Pick an instrument and click on "Chords".
What you see here is a matrix of chords of our scale. You can find triads in the upper part and four note chords in the lower part.
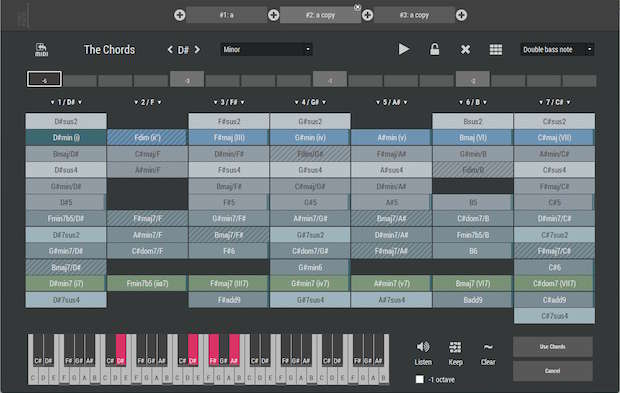
Let's create a chord progression now. Click on the timeline slots and choose your chords.
Click on "Use chords" when you are ready.
- The chord track
-
Now all we have to do is clicking on "Follow the chords with this instrument".
As you can see, the Source mode is set to "Full Chords" now. For our melody we used "Scale Notes". In "Full chords" mode the pattern will trigger all the chord notes at once.
- Step 5: Basslines
-
Let's create a bassline now. Many basslines will focus on the lowest note of the current chord and play it back with a certain rhythm.
So let's click on "Follow the chord notes with this instrument". Play it back.. and lower the octave a bit.
Click on "Oct" with your left mouse button to transpose a note one octave higher. Or use your right mouse button to lower the octave.
- Step 6: Arpeggios
-
 Our final step: We will create an arpeggio.
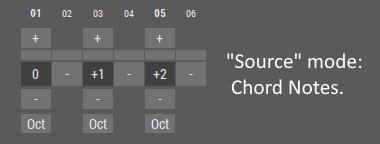
Click on "Follow the chord notes". The Source mode is set to "Chord Notes" now.
This means that the zero in the pattern will play back the first note of the chord. The one will play back the second note, and so on.
This sounds a bit strange right now, and here's why: Normally, an arpeggio plays on the main notes of a chord.
In my example, though, I added an extra bass note to each chord. This is a common technique to tell Sundog which note should be used for the bassline.
Because of that, the 0 plays the bass note, the 1 plays the next note, and so on. We wanna change it so that the 0 will play the first main chord note instead.
Let’s click on "Advanced" and choose "Remove lowest note". That way, the arpeggio will skip the bass note and sound much cleaner and more musical.
- Step 7: MIDI export
-
In the end, we can simply export our song to the DAW via drag and drop. Pick the small MIDI symbol and drag it to the DAW.
- Power tools
-
As I said before, Sundog contains many built-in power tools to create arps, basslines, and melodies quickly.
The easiest way to get started is the Actions menu up here. When you click on it, you can see different options to create a solid base for your song.
We can also use this menu to transform or randomize an instrument. For example, we can pick "Transform pattern -> Reverse" to instantly flip the current pattern.
When we do a right click in the Pattern area, we can also find the same Pattern transformation actions here.
- Advanced tutorials
-
There's a lot of other stuff that Sundog can do for you. Just take a look at the other tutorials and check out the manual.