ChordPotion Manual
- Contents
-
- Introduction: The ChordPotion concept
- Setup
- Main user interface elements 1 (top bar, bottom bar)
- Main user interface elements 2 (most important elements)
- Main user interface elements 3 (advanced concepts)
- Editing patterns
- Working with different MIDI channels
- Switching between pages
- MIDI export
- MultiPlay patterns and effects
- Working with random patterns
- What happens when you press "Generate new variation"?
- Using the clipboard to exchange presets
- Other settings
- Creating and importing own packages
- Introduction: The ChordPotion concept
-
ChordPotion is a MIDI plug-in that transforms incoming chord notes into entirely new phrases, rhythmic chords, and melodies. Build your own creations by mixing different rhythmic patterns with each other. Choose separate patterns for different transformer rows to build complex pieces easily.
You can export the generated output as standard MIDI files as well. This way you can build new songs quickly and efficiently while experimenting with new playing styles.
- Setup
-
Depending on your DAW and your operating system you will need to copy the plug-in to a different location. The most common locations are:
Windows: Copy the file ChordPotion_x64.dll to the folder "c:/program files/Steinberg/VstPlugins/" (this is the default for most 64 bit DAWs).
macOS: Copy the file ChordPotion.vst to the folder "/Library/Audio/Plug-Ins/VST/". Copy the file ChordPotion.vst3 to the folder "/Library/Audio/Plug-Ins/VST3/". Copy the file ChordPotion.component to the folder "/Library/Audio/Plug-Ins/Components/". Please note: The AU version (ChordPotion.component) is only needed for Logic Pro X. Most other hosts (e.g. Ableton Live) will need the VST version instead.
ChordPotion acts as a VST instrument or AU MIDI effect inside your DAW. It receives notes like any other instrument and can send the newly created notes to other plug-ins. The VST versions also include a built-in piano module that can be used to work with ChordPotion without connecting it to other instruments.
Please consult the manual of your DAW to find out how you can pass the MIDI note output from one plug-in to another plug-in. Some pointers:
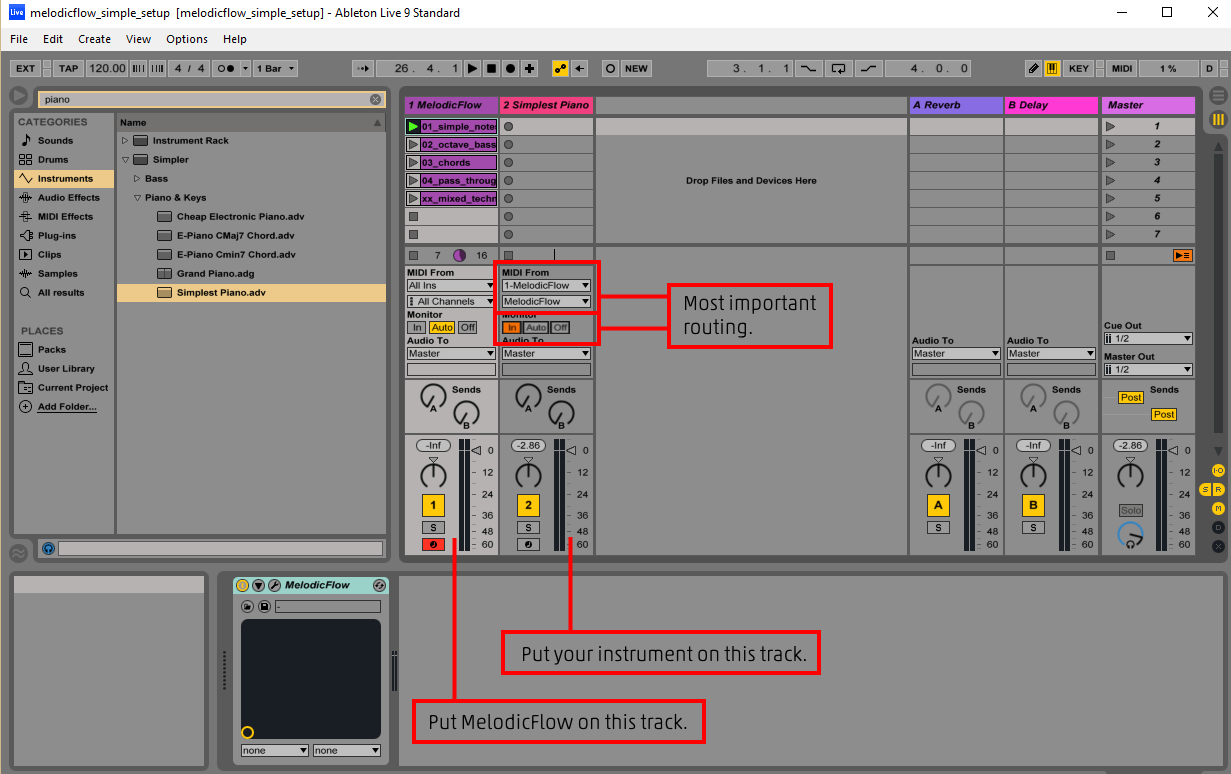
- Ableton Live: How to access the MIDI output of a VST plug-in? You can find an image with a MelodicFlow example routing here: *click* (ChordPotion uses the same routing). You can also take a look at this short YouTube video.
- Bitwig: Add ChordPotion to an instrument track. Then add another instrument to the same track (after ChordPotion in the device chain).
- BlueCat's PatchWork: Add PatchWork to a track of your DAW. Inside PatchWork, do this: Add the VST version of ChordPotion to a slot of the "Pre" section. Click on the ChordPotion slot, set "MIDI Output" to "Port A". In the "Parallel Chains" section, add a new synth to the first slot of a row. Click on the slot, set "MIDI Input" to "Port A -> All channels". Make sure that "MIDI Input -> Host" is set to "None".
- Cakewalk: See "Sonar".
- Cubase: Add ChordPotion to one track, and another instrument to a different track. From the Input Routing list on the instrument track, select ChordPotion - MIDI Out. Turn on monitor input on the instrument track by clicking the monitor button. You can also take a look at this short YouTube video
- FL Studio: Add ChordPotion to a new channel. Click the Wrapping Settings button. Set Output port to 1 in the settings panel. Add another instrument to a different channel. Click the Wrapping Settings button. Set Input port to 1. You can use any port number you like, but the output and input port number must be the same. You can also take a look at this short YouTube video
- Logic Pro X: Insert ChordPotion in the MIDI Effect slot of a track. Then add an instrument in the Instrument slot.
- Mixcraft: Add ChordPotion to a track. Then add another instrument to the same track (directly after ChordPotion).
- Pro Tools: ChordPotion is not available in AAX format. However, you can use a third-party plug-in wrapper like Blue Cat's PatchWork to work with ChordPotion inside PT.
- Reaper: Add ChordPotion to a track. Then add another instrument to the same track (after ChordPotion in the device chain).
- Sonar and Cakewalk: Add ChordPotion to a new instrument track. The "MIDI Output setting" must be checked in the "Insert Soft Synth Options" window. Then add another instrument to a second track, open the "Track Inspector" and set "MIDI Input" to "ChordPotion -> MIDI Omni". You also have to activate the "Input Echo" button on the second instrument track. You can also take a look at this short YouTube video
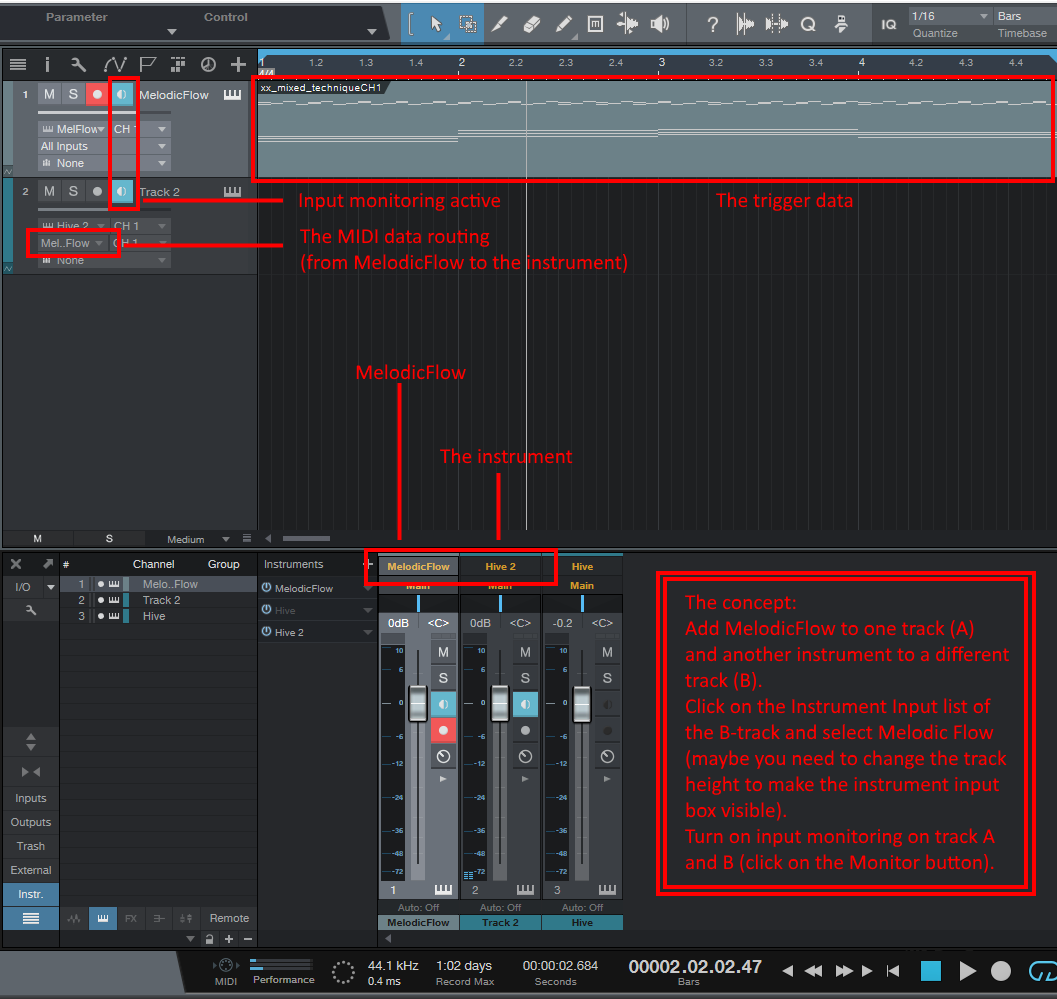
- Studio One: Add ChordPotion to one track (A) and another instrument to a different track (B). Click on the Instrument Input list of the B-track and select ChordPotion (maybe you need to change the track height to make the instrument input box visible). Turn on input monitoring on track A and B (click on the Monitor button). You can find an image with a MelodicFlow example routing here: *click* (ChordPotion uses the same routing). You can also watch a YouTube video by Czar (thanks!) to see the routing in action.
- Main user interface elements 1 (top bar, bottom bar)
-
The top bar contains several different areas:
- Twelve page buttons: Use the different pages to work with different ideas or switch between presets that you want to use in your song.
- Sound button: This button is only available in the VST version of ChordPotion. Activate the button to use one of the built-in sounds. This is especially useful if you don't want to connect ChordPotion to a different plug-in first.
- MIDI drag and drop button: This button will only appear when you start to feed ChordPotion with input notes. ChordPotion will record all the output notes then (button colour: grey). As soon as you stop playback, the button will change its colour and display a note symbol. You can drag the generated MIDI file to your DAW then.
The bottom bar:
- Swing: There are two different swing modes available. The 16th note swing is the default mode and is especially common in electronic music genres. The 8th note swing is your second option to add some shuffle to your songs.
- Octave: Transposes the output notes up or down.
- Presets box: Pick one of the included presets to get started quickly.
- Clipboard button: Import and export presets using the clipboard. You can also copy, paste, load, and save your page here.
- Main user interface elements 2 (most important elements)
-
The main section of ChordPotion contains four different rows that can be used to transform the incoming chord notes.
Basically it works like this: Pick a "Pattern" for at least one row. You can do this for as many rows as you like. ChordPotion uses these pattern rhythms to build new output from the input notes then. The output notes of all rows will get merged together and create the final output.
It is possible to send the generated notes to different MIDI channels. Please read the separate section of this manual for more information.
The solo (S) and mute (M) buttons can be used to listen to the four rows independently.You can change the velocity, the speed, and the octave pitch for each row. You can also decide whether the patterns should only run once (Repeat: Off) or run forever (Repeat: On).
Click on a label to reset the corresponding field to its default state. For example, when you click on the "Octave" label, the octave setting will revert to "0".
There are two types of rows:
- "Chords": The patterns that you choose here will get applied to all input notes at once. This is especially useful for creating rhythmic chord sections.
- "Melody": You can use up to three melody rows to create complex polyphonic melodies. Each row can play monophonic riffs like arpeggios, basslines, etc.
The pattern names always contain some information about the pattern length. "16s" corresponds to a length of 16 steps, "06s" means "6 steps".
Use the "Mode" box to switch between two different run modes.
- "Restart on chord change": The internal sequencer starts again whenever a new chord begins. This happens when all old input notes stop and a new set of input notes comes in.
- "Keep on running": The internal sequencer starts when the DAW starts to play. It keeps on running until the DAW stops or until the DAW loops.
The "Tripletize" mode can be used to convert all melodic patterns into a "triplet version". Please note that the swing settings won't get applied then, because a triplet rhythm is already a kind of "swing rhythm".
There are different FX boxes available that can be used to transform the patterns. Two of these boxes are available per row. Two additional boxes can be found below the rows. They affect all rows combined. Some effect names end with an "S", "M", "L", "XL", or "XXL". These indicate the effect strength ("S" is "a little bit", "XXL" is "a lot"). You can work with the following effects:
- "Add notes": Will add some new notes to the pattern.
Please note: Some of the original patterns contain only notes that sit on beat and offbeat positions. The "Add notes" variations S, M, and L will only add new notes that sit on beats and offbeats as well. The XL and XXL versions will also inject notes at other positions. - "Make it MultiPlay": This effect is only available in the "Chords" row. You can read more about this effect in the MultiPlay section of this manual.
- "Pattern length * X": Use this effect to duplicate a pattern several times. Useful in combination with other effects that randomize the new pattern then.
- "Pick only one melody row": This effect is only available in the global FX boxes. If it is active, ChordPotion will only work with one randomly selected melody row. This is especially useful in combination with MultiPlay patterns.
- "Randomize note length": Changes the note lengths to a certain amount of steps.
- "Randomize notes": Replaces some of the notes with other notes.
- "Randomize velocity": Randomizes the velocity of each note.
- "Remove note stops": Replaces short notes with longer notes that run until the next note of the pattern is reached.
- "Remove step effects": Removes step randomizer settings.
- "Remove velocity changes": Resets the velocity to full force.
- "Remove notes": Removes some of the notes.
- Main user interface elements 3 (advanced concepts)
-
A) Input Chord Effects aka CFX
Click on the "CFX" and "Page CFX" buttons to change the "Input Chord Effects" settings. "Input Chord Effects" are algorithms that transform the incoming chords before the sequencers react to them.
Example: Let's say you alternate between two chords. The first chord uses a bass note that sits one octave below the other notes (e.g. C2-C3-E3-G3). The second chord is a standard triad without added bass (e.g. E3-G3-B3).
Your problem: You want to generate an arpeggio that only plays on the main chord notes, but not on the added bass note of the first chord.
The solution: Click on "CFX". Then change the first box from "No action" to "Remove bass if needed". Click on "OK". Now ChordPotion will take a look at the incoming chords and remove the lowest note if it is more than five semitones apart from the second lowest note.You can set "CFX" for each row separately, but you can also set "Page CFX" to cover all rows at once. If you set both "Page CFX" and row "CFX", the row settings will overwrite the page settings for this row.
There are different algorithms available:
- "Add original bass": Adds the bass note that was used in the orginal input chord. Might be useful if you removed or changed the bass with one of the other boxes in the transformation chain.
- "Duplicate bass": Adds the same bass one octave below. C3-E3-G3 will become C2-C3-E3-G3.
- "Keep only bass": C3-E3-G3 will become C3.
- "Keep only bass and top": C3-E3-G3 will become C3-G3.
- "Move bass close to rest": C1-E3-G3 will become C3-E3-G3.
- "Remove bass": C3-E3-G3 will become E3-G3.
- "Remove bass if needed": Only remove the bass if it is more than five semitones apart from the second lowest note. C3-E3-G3 will stay the same, but C1-C3-E3-G3 will become C3-E3-G3.
- "Stack other notes on top of bass": C2-C3-G3-E4 will become C2-E2-G2.
- "Open chord": Moves the second note one octave up. C3-E3-G3 will become C3-G3-E4.
- "Move everything one octave up": C3-E3-G3 will become C4-E4-G4.
 Some algorithms refer to a "tonic" or display a "(3rd oct.)" hint. When you use one of these algorithms, ChordPotion will show you a scale selector at the side of the octave and swing settings. Set this selector to the tonic note of your chosen scale (e.g. "A" for "A Minor" or "A Major"). Some algorithms will move certain notes close to the chosen tonic then:
- "Add calculated root bass (3rd oct.)": This algorithm will try to guess the right closed root chord and then add the corresponding bass note to the current chord. C4-G4-E5 (open chord) will become C3-C4-G4-E5 (because the closed root version would be C4-E4-G4).
- "Move everything close to tonic (4th oct.)": This will move the complete chord close to the tonic note of the page. C5-G5-E6 will become C4-G4-E5.
- "Set to calculated closed root position (4th oct.)": This algorithm will try to guess the right closed root chord. C5-G5-E6 (open chord) will become C4-E4-G4 (closed root).
- "Replace with scale notes": This will replace the entire chord with the notes of the chosen scale. Very useful if you want to create melodies on the scale.
Finally, there is another area called "Do this on chord change". This area is only visible if the page mode is set to "Keep on running". Here you can specify what happens when a chord change occurs. This action will only be executed if the currently active step is empty ("-").
- "Stop all playing notes": Stops all playing notes.
- "Trigger a '0'": Will do the same as a step that is set to "0".
- "Repeat last note trigger": Repeats the same note trigger that was used in this pattern before. For example, this will trigger a "1" if the "1" was used last time.
- "Repeat last note trigger (except 'resume')": Repeats the same note trigger that was used in this pattern before. But don't use the "resume playing notes" step effect, if it was set.
B) Sequencer modes
The three melody rows can operate in different sequencer modes.
Use the "Arp" box to switch between them. This setting is especially interesting when you work with chords that cover more than one octave (open chords etc).- "Constant direction": Whenever you go up in the sequencer (0, 1, 2,...), the generated output notes will also go up. Whenever you go down (0, -1, -2,...), the generated output notes will go down as well.
- "Octave cycle": This mode will cycle through the input notes and transpose the output notes one octave up (or down) whenever a new cycle starts. Example: Input notes are C3-E4-G4. 0 = C3, 1 = E4, 2 = G4, 3 -> a new cycle starts -> 3 = C3 + 1 octave = C4, 4 = E5, etc. -1 = G4 - 1 octave = G3. Please note that this mode is especially interesting when you want to create lead melodies, because the -1 in the sequencer will always play back the highest note of the chord. No matter if the input is a triad or a four-note chord.

- Editing patterns
-
If a pattern is not too complex ("MultiPlay", "Random [...]"), it is possible to edit the pattern. When the "Edit" button is enabled, you can click on it to display a special type of step sequencer.
As soon as the pattern is triggered, a step light moves from left to right. Each step can contain either a numerical value, a "#", or a "-".
Numerical values trigger a note ("Melody" rows) or a chord ("Chords" row). In the first scenario, a 0 triggers the bass note of the currently active chord. A value of 1 triggers the second note of the chord, and a value of 2 triggers the third note. In the second scenario, a 0 triggers all the notes of the currently active chord. A 1 triggers the first inversion, a 2 triggers the second inversion, and so on.
A "#" means that the currently played note(s) will get stopped. A blank field ("-") does nothing.
Click on the steps to switch between the different states. Click on a "-" step to turn it into a numerical value, click on a numerical value to turn it into a "#".
Click on the "Oct" field to pitch the note(s) by one octave. Click a second time for two octaves. A third click resets the pitch to the default. Use the right mouse button to pitch the notes down by one or two octaves.
You can set the velocity level per step by changing the value of the velocity slider. If you edit a "Chord" row pattern, you can also change the strum direction and strum duration per step.
Use the "step effect" field to add randomization effects. Click on the field and a new window will appear. You can work with different step modifiers now. On the left, you can see various "probability" sliders. They indicate how likely the effects on the right will occur. The sliders can go from 0% (= will never happen) to 100% (= will always happen).
There are various effects that will only modify the step if the final step type is a note trigger. If "Resume playing notes" becomes active, the sequencer won't stop already playing notes of this sequence. This is contrary to the normal behavior where the sequencer stops all playing notes before a new note becomes active.
You can also add a pitch effect here. For example, choose "Pitch up to note" + "2 steps" + "Smooth" + 50% intensity if you need a pitch movement that bends the wheel from the bottom half position to the center position within two steps. Please note that the MIDI standard doesn't work with absolute semitone positions. Many synths allow you to change the pitch range, though (and many times, the default is 2 semitones up/down). Please also note that the VST3 version of ChordPotion MIGHT NOT send pitch wheel movements to your synth. More info: https://feelyoursound.com/vst3-midi/
Click on "OK" if you want to keep the changes that you made to this step or simply click outside the dialog window.
Attention: When you set "Randomize octave" to "+1" and use a probability of 100%, ChordPotion will always add "+1" to the normal octave settings. This is not really random anymore, because the final result will always sound the same. Use a probability of e.g. 50% to change the octave only from time to time. When you set "Randomize octave" to "+2" and the probability to 100%, ChordPotion will randomly add +1 octave or +2 octaves to the step each time. The same concept applies to the other effect types and their settings.Most step effects are self-explanatory. However, here are some tips for the more complex ones:
- "Rand. add note": This one is especially useful for the melody rows. It triggers an additional note on top of the main note. This way you can play polyphonic melodies. Example: The step is set to "1", the step effect is set to "Add extra note: + 2". This will trigger two notes at once: a "1" and a "3" (1 + 2 = 3).
- "Rand. note move": This effect moves the triggered note to a different pitch. Many options here require that you specify a scale in the main user interface (bottom border next to the swing and octave settings). For example, "Close scale tonic" will move your note to the closest available tonic note (e.g. a "C" when the scale is set to "C Major"). When you choose a "close" variant, ChordPotion will choose the note that is closest to the current note. This can be either higher or lower than the note itself. When you choose the "next" variant, ChordPotion will pick a note that is higher (or equal) than your source note. Finally, you can use this step effect to walk on the scale. When you choose "Scale +1" for example, ChordPotion will trigger the scale note that comes directly after your current note. "Scale -1" triggers the note that comes directly before your current note on the chosen scale.
You can drag and drop both steps and step effects. Simply drag them to a new slot. Hold down Cmd (Mac) or Ctrl (Windows) to create a copy.
Use the field at the bottom right of the pattern to change the pattern length.
Click the "Actions.." button to see a context menu containing various pattern transformer actions. Here you can, for example, delete all stop symbols or reverse the pattern with one click.
- Working with different MIDI channels
-
You can use the "Channel" setting to pick a different MIDI channel for each row. Rows that share the same channel number will get merged together. When you work with different MIDI channels, it is possible to send the "Melody 1" row notes to a different synthesizer than those of the "Melody 2" row. This way ChordPotion can trigger several instruments at once.
This setting also affects the MIDI drag and drop feature, because ChordPotion will create a new data section for each channel. This way you can drag and drop the recorded notes to multiple DAW strips right away.
When you load a preset where all channels are set to "1", ChordPotion will keep the channel settings as they were before you opened the new preset. This way you can test different presets without setting up a more complex channel routing each time. If the new preset contains a more complex routing itself, the preset routing will overwrite the current routing.
Please note: The "channel" feature is pretty easy to set up inside ChordPotion. However, routing the output notes to different synthesizers might require some advanced knowledge of your DAW. Please consult the manual of your DAW to find out how you can achieve this.
FeelYourSound also maintains a page where you can find setup tips for different DAWs.
You can find it here: https://feelyoursound.com/multi-channel-daw-setup/
- Switching between pages
-
Click on the different page buttons to switch pages. You can also use the lowest notes of your MIDI keyboard for that: lowest C -> page 1, lowest C# -> page 2, lowest D -> page 3, lowest D# -> page 4, and so on.
- MIDI export
-
As soon as ChordPotion receives MIDI notes, it will start to transform them. The generated output notes are automatically recorded. When you stop your DAW, you can drag and drop the generated MIDI file to your DAW.
One of the best ways to work with ChordPotion goes like this:
- Write down some input chords in your DAW.
- Choose a nice ChordPotion preset or create a preset on your own.
- Start the playback in your DAW.
- Wait until the output notes have been generated.
- Stop playback in your DAW.
PS: You don't need to match the end of your chords sequence perfectly. ChordPotion will shorten the generated MIDI file a bit when it detects that you stopped the DAW a bit behind a new bar. - Did you like the generated output? Then drag and drop the MIDI button from ChordPotion to your DAW.
If you use different MIDI channels for the various rows, ChordPotion will create a multi-channel MIDI file for you.
- MultiPlay patterns and effects
-
MultiPlay patterns are an advanced concept that might be difficult to understand first. However, once you get a hold on it, you will be able to create even more complex and nuanced presets.
There are some patterns in the "Chords" section that start with the word "MultiPlay". MultiPlay patterns work like this:
- Each MultiPlay pattern contains different melodic rhythms.
- When ChordPotion starts to play, it picks one of these rhythms, adds the "Melody" rows, applies the different FX slots, and creates the output.
- When "Repeat" is "On" and the rhythm ends, ChordPotion picks another rhythm, adds the other sections, and continues.
There is an option to turn on MultiPlay for other patterns as well. Simply choose one of the "Make it MultiPlay" options in the FX1 or FX2 section of the "Chords" row. Please note that these options will overwrite the "Repeat" setting of the Chords row.
- "Make it MultiPlay (play once)": When the rhythm ends, ChordPotion resets the original Chords pattern, adds the other sections, applies the different FX slots, and continues. Attention: When the Chords pattern is shorter than the Melody patterns, the Melody patterns won't get played back fully.
- "Make it MultiPlay (repeat forever)": ChordPotion will continue to play this pattern (and the linked Melody patterns) on and on. When the mode "Restart on chord change" is active, another pattern combination is chosen when a new chord comes in.
- "Make it MultiPlay (no repeat): When the rhythm ends, the Chords pattern stops. The linked Melody patterns continue to play.
The "Make it MultiPlay" option is only interesting when you use other FX in your preset as well. If you don't use other FX, the resulting pattern combinations will always sound the same.
Another nice trick: Use "Make it MultiPlay (play once)" in combination with the global FX option "Pick only one melody row". This way you can create combinations of rhythmic chords and monophonic melodies. You can use the different Melody rows to create melody fragments that are picked randomly each time a new MultiPlay cycle begins.
The following video explains the MultiPlay mode in more detail:
- Working with random patterns
-
It is possible to add some extra randomization to your creations:
Some patterns start with the word "Random". Pick such a pattern (e.g. "Random arp multi up") and ChordPotion will choose a different rhythm each time you click on "Generate new variation" (in this example different arpeggios that go up).
You can combine this method with the MultiPattern concept to create even more complex sequences.
- What happens when you press "Generate new variation"?
-
Whenever a parameter is changed, ChordPotion generates a new "note trigger data model" from scratch. As long as you don't use randomization (e.g. by working with "FX 1" and "FX 2"), this data model will always sound the same. However, as soon as you add a randomization source, "Generate new variation" will result in new melodies.
If you don't use randomization elements on your page, the "Generate" button will be shown grayed out. Please note that "step effects" don't count as randomization elements here, because they get applied each time the sequencer reaches the step.
- Using the clipboard to exchange presets
-
You can use the clipboard button to copy the current pattern to the system clipboard. You can paste this text anywhere you like, for example in a forum or in an e-mail.
Anybody who copies this pattern data can import it into ChordPotion again. Simply click on the clipboard button and choose "Paste from clipboard".
When the clipboard contains more than one pattern string, ChordPotion will ask you whether it should save the data to separate files on your hard drive.
- Other settings
-
Click on the settings button (cog wheel) at the bottom of the interface. You can switch between different themes, and you can also change the user interface size here.
You can always reset the UI size by right-clicking the version information label (top border). This might be handy if the plug-in size has become so large that you cannot see the bottom row anymore.
- Creating and importing own packages
-
It is possible to create own packages and to share them with other users. These packages end on ".fys". They are plain text files that contain data which was previously copied to the clipboard with the "Copy to clipboard" feature.
To create an own package, follow these steps:
- Create a new text file.
- Copy a pattern to the clipboard (click on the clipboard icon inside ChordPotion, choose "Copy to clipboard").
- Paste the pattern data to your text file.
- If you want to give this pattern a name (recommended!), you need to put a "File: [file name.pge]" in front of the data part.
- It is possible to create an own subfolder for your package. Simply insert a line with the following syntax: "Folder: [package name]"
This is an example file:
Folder: Simple arpeggios
File: Arp up 1.pge fysscpp1_39eNqtV8lu2zAUvAfI Pwi6Fm5MeokN2A4S t2lRNAtiN3daelpa iRQoKnGKfHy5SNZi O2XR6CSORm+Zoemn 2cU2TZwn4HnM6NxF H-uuA9RjfkzDuftj fd2buBeL05PTk1lG QqiYS+aDYmPFj6kP W7mStxkRAjhd8zgM ga9fMsVynfxZh+t- HLmnJ46+NFQSxvJF DjmIW5LKteQXm3vO foInvgAFTgT4n4gg VxAwriNWUQQJc-UC 8wR5glUUB0KmcR0f ZBlpTONcxN418QTj c7enKvFIAg+MiVsm QFF39agHt0W6AcnE JVGRvhVpdsk5eZFs VF-uQr05Kxvu6lKr Iu-a6spi4icjS0Ty KwC6ZoUXgd-sS18J 0FBEc3foOs8Qh5Ew GueCcPEVuC5fpskK sWIF98yaQwZENDvT lxSoVEfmDYmoqkxN wa5DZavfy4RYZvQi Qikk6tnCRKp6zQVk ebO4Vn+LKu1M8Roq qKXxG5tsjyQpTM1d 93LBi3SvBZknYV4s Xkyis8OZ0PFM6H0z 4eOZ8PtmGhzPNPzP TLOzpqtmT1eQ5Q5H ZbC-M7E1c2DNHFoz R9bMsTXz3Jo5sWZO rZmob0+1dwnZ24Ts fUL2RiF7p5C9Vcje K2RvFrJ3C9u7hf-h N2XvFrZ3C9u7he3d wvZuYXu3sL1beOdW PWHsjTRqGNFPzDSy jBj375mQlNaow6m- AvWv3UOjQR9NJngw 7Ry5jpyHuAwii8qX EXi-cnUwB9PReIz9 6QjOYTPCngc4wOdD Mp4SGE+nE9cRLLs3 rczdS545G5LHnlNk ztVeAkl9bB3sCrnT -whz9wPSy4dyJLij ernKdNloeyjYiiVM MoNAU28KNShUq2U9 Eqjl9RbNXTkhRXKQ KwFcAwdi3z3TXVv6 hc9+LLodvoIEySYB NYJI5fPdK8ciG1pH BQNWQuyAphQGOa5G +bwWxAANTQzQlMUg LWUOh21pVVXb0sdg RqKS+EoZ3cnTjbth QrB0T60S78hjwEqe HjoSrSmXQWq5KqDW xwC1PodjNuUySHsj VRjew1r6HA5+XC4H toKTfXk03FanG1pT GltJr5vSaKChjFnv hDkYr7GN9Lopiwba qpTQGz8wU2VrC2no DUlYpr6t5MF2o8++ B9CfFg6jZvPpb4Bw f6cJHmcJiPh31UDQ KjVoVqmOWzVQhiBv -gB+z092_cpp1fyse
File: Arp down 1.pge fysscpp1_cdeNqtV1tv2jAUfq-U -xD5dWqLTaFBAqqW rZum9aLC+m6Sk8sW 7MhxWjr1x8+XBBIC nactTzlfPp-Ld4x9 GF+uV5n3DKJIOZsg fNpDHrCAhymLJ+j7 4ubER5fT46Pjo3FO Y6iZMx6CZhPNT1kI a2Vh5OVUShBsIdI4 BrF4zTULecWLcdc7 HaDjI888BqoIQ7VQ QAHyjq6Urfjl8kHw HxDIz8BAUAnhRyrp NURcGI+1F0njQi-g gaTPME-SSKowyAtB pbFKWVrINLihgeRi gk50JgHN4JFzeccl aOomH-3hrlwtQTFJ RdSkr+UqvxKCvio2 3j5oqleOq4J3ddmq ot7a6qpk0mcrS0KL awC24GWQQNisyzwZ sFgmE9RH3gukcaJK w8pBIamQX0CY9FWY vJRzXorA2gJyoLJZ mXmUQJU6Km5MZZ3l yiaMPKZK-VYFJOfI CxLKGGRai6n1VNda SMiLZnKt+qZ12LHm NVTQpu03sdGeaFZa a7d7hRTlqlOCipPx IJWvNtDZ-kj4cCT8 fyORw5F6-xhpfNbU 2u60GnLcd7hy9mcm cWb2nZnnzsyBM3Po zLxwZvrOzJEzE-fc qe5dwu5twu59wu6N wu6dwu6twu69wu7N wu7dIu7dIn-xm3Lv FnHvFnHvFnHvFnHv FnHvFnHvFtl0a3vv dwYNPSKYL3ZGmCVc hA9cKkprABEsnIO5 S0fD3oj0+iOyc+J6 akgRyofKqZglEPws 9LnsLykZRmH-fOD7 F3To+4E-6PcGPlBK IqBL5EmeP9hKJuhK 5N6SFmnghfyFeVed EIr81DrZNXJvroQJ +oCN+Vjd1PfMmPPc 5r3e52zOM66YUWSo t6W+v2trVt-U1u3N Gk+QGlwSNV9VANkC e3zfv7BNYWbBpzCV 3RrfQMF0mYGeDZT4 xWbRId+WtqODBWsp NkBTDIsc1qP6vpXE Ag1VLNAUxiItbfa7 balVZ9tSyGJWpIr4 xjjbyLPrd8ml5KuO WhW+I48Fa3lO8AFv TbksspWrBrb6WGCr z36fTbks0t5KNUY6 WEuf-c4Py+XBWgra lcfAbXV2XRtKYysZ uymNARrKWHsjzF5- jW1k7KYsBmirUkHv -MRslq0tZKB3JOG5 -tOjzrZbc-w9gpn5 Pc7s5jPDedzdaVKk eQYy-VUXELVSjZpZ 6hNXz5QxqJffNJ0z tQ==_cpp1fyseThis example file contains two presets called "Arp up 1.pge" and "Arp down 1.pge". They are stored inside a folder called "Simple arpeggios". Simply save this text section to a file called "arpeggios.fys" and you can import it into ChordPotion (click on the "Load" button next to the preset list, then choose "arpeggios.fys").
You can also copy this text section to the clipboard and then import it into ChordPotion via "Clipboard button -> Paste from clipboard".