- Home
- Download SongEngine (free)
-
Expansions
- Big expansions:
- ChilloutEngine
- HipHopEngine
- HouseEngine
- TranceEngine
- Smaller expansions:
- Modern Strings
- Tools:
- ChordConverter
- MassExporter
- Bundles
- Tutorials
- Manual
- Newsletter
- Contact
SongEngine Manual
Contents
- Introduction
- Setup
- Importing MIDI chord progressions
- Generating chord progressions
- Editing chord progressions - the "Chords" page
- Working with Chord Pads
- Loading and saving chord progressions
- Working with presets - the "Packages" page
- Exporting presets
- The Live Mode
- Working with song parts
- Routing MIDI output to another synth
- Keyboard shortcuts
- Frequently asked questions
Introduction
SongEngine is a free plug-in that specializes in two things:
- Creating chord progressions.
- Generating new basslines, phrases, and melodies that fit your chords automatically.
The concept is simple:
- Create a chord progression. You can also import existing MIDI chord progressions or let SongEngine generate a chord progression for you.
- Switch over to the "Packages" view.
- You can see a big list of presets now. Select a preset, then press play in your DAW for a preview.
- Do you like a preset? Drag and drop the MIDI file to your DAW.
- The plug-in will copy the MIDI data to your DAW.
Setup
Simply download the installer and install the plug-in on your system. Then open your DAW and add SongEngine to a track.
Importing MIDI chord progressions
To import your own MIDI chord progressions, go to the "Chords" page, then click on "New..." (bottom right).
You can import files via drag and drop or via "Import chords from MIDI file...".
Your MIDI file should look like this:
- Contains only chords, not melodies.
- Contains only one MIDI channel with data.
- All notes are quantized to 16th.
- Recommended: Dedicated bass notes.
Example:
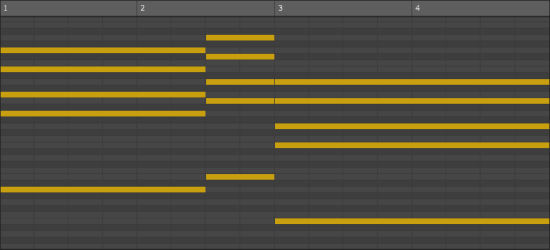
If your chord progression doesn't contain dedicated bass notes (the lowest notes of the chords), then SongEngine will guess some good bass notes for you.
Generating chord progressions
SongEngine contains several chord progression generator algorithms:
- Open the "Chords" page.
- Click on "More" (bottom right).
- Click on "Generate chord progression" and choose a fitting algorithm.
The plug-in will generate a first progression and display it on the "Chords" page. Click on the dice icon to generate another variation.
When you click on "More", you can see a "Lock scale" setting. When "Lock scale" is active and you click on the dice symbol, SongEngine will generate a chord progression for the currently chosen "Associated scale".
Tip: If you want to generate a chord progression for a specific scale, it's usually quicker to go back to the starting page, click on "Generate chord progression", and then choose "Generate for specific scale".
Editing chord progressions - the "Chords" page
You can edit chord progressions on the "Chords" page. Press play in your DAW to listen to a preview.
Right-click on a chord to change the bass note or modify the chord if needed. You will also find some functions to change the whole chord progression at once here.
Use the handles at the start or end of a chord to make it longer or shorter.
You can move any note around (but only vertically). Double-click on a note to remove it, and double-click on an empty spot to create a new note. The colourful small lines at the beginning of the active chord will show you which notes are on the scale.
Use your left and right arrow keys to switch between chords. Use the up and down arrow keys to invert a chord up or down.
Click on the bottom bar to hear a preview of the chord. You can also find its detected name here.
The "Associated scale" setting will only affect some of the presets on the "Packages" page. It does not transpose the chords when you change the scale name or the root note! The key/scale setting is important for SongEngine to take the musical context of the progression into account. When you import a MIDI chord progression, the plug-in should guess the correct scale. However, if it detects the wrong scale, you can change it manually here.
At the bottom, you can find the Chord Pads area (see next section). Click on the triangle button to fold and unfold this area.
Working with Chord Pads
Chord Pads are an easy way to create new chord progressions quickly. Drag a pad to the chord progression area to either replace a chord (drop it at the beginning of an existing chord) or to insert a new chord (drop it somewhere else).
Click on any pad to hear a preview. You can right-click a pad to rename it, change its colour, and more. When a pad shows a bold stripe at the top left corner, this means that the pad contains notes that are outside of the current scale.
You can trigger Chord Pads with your computer keyboard or with your MIDI keyboard.
- Computer keyboard: Use 1 to 9 for the first nine pads. Hold down "0" to activate the second Chord Pad row.
- MIDI keyboard: Use the white keys for the first seven pads, G#, F#, and A# for pads 8, 9, and 10. Hold down C# to activate the second Chord Pad row.
Click on the "More" button to see actions that affect the whole chord pad collection. You can save and load pads here, change the number of columns and rows, etc.
When you activate the "Flow" button (the button with the wavy icon next to the "More" button), the notes of each pad will automatically adjust to the existing chords of your chord progression. This way, you can create progressions where the notes "flow" from one chord to the next without large jumps. The voicing of the first chord of the progression will be used as a reference.
The "Pad Source" field shows the name of the currently active pad source collection. When you click on the name in the middle field, a new dialog will show up. In this dialog, you can load a pad collection that you would like to work with. Double-click on an entry to load it (or click on the OK button).
There are two main types of pad sources:
- Generators: These are special algorithms that fill the chord pads automatically. For example, there are several generators that fill the chord pad area with chords that fit the chosen "Associated scale". When you change the scale, the pads will get recalculated again.
- Chord Collections: These collections contain chords that were created by hand. For example, there are "Genres" collections and "Common scale progressions" collections. In most cases, this means that the chords work especially well together. Collections will get transposed automatically: When a collection was created in C Major, and your current "Associated scale" is E Major, SongEngine will transpose the pads so that they fit to E Major as well.
Of course, you can create your own Chord Pad collections as well. Simply edit the pads, then click on "More" (to the right of the "Pad Source" field) and choose "Save pads...". You can also use the built-in mass converter to convert an entire folder (+ all direct subfolders) of MIDI chord progressions to Chord Pad Collections. You can find the mass converter here: Chords Page -> "More"-button at the bottom right -> "Convert MIDI files to Chord Pad Collections". The resulting files will be available in the "Own" folder of the Pad Source menu. To define the scale of a progression, add it in brackets at the end of the filename. For example, "test (C).mid" is interpreted as C major, while "test (Am).mid" is treated as A minor.
You can switch between four banks of pad collections. Each collection can have its own Pad Source model.
Loading and saving chord progressions
You can save a chord progression to your hard drive or to the clipboard:
- Open the "Chords" page.
- Click on "More" (bottom right).
- Choose "Save chord progression" or "Copy chord progression to clipboard".
To load a chord progression:
- Open the "Chords" page.
- Click on "More" (bottom right).
- Click on "Load chord progression...".
- Choose "... from file" or "... from clipboard".
Working with presets - the "Packages" page
When you click on "Packages", you will see a list of packages on the left side and a list of presets on the right side. Each preset belongs to a package.
Select a preset, then press play in your DAW to hear a preview.
You can find a search area and a settings area at the bottom. Click on the header bar to make all elements visible. Then do a search or click on a tag to see only presets with that tag. You can select multiple tags as well.
Each preset has a star-shaped "Favorite" marker. It is located to the left of the MIDI drag-and-drop field. Use the "Show favorites" tag in the tag browser to display your favorites only.
Below the "Favorite" star, you can find a preset type icon. Hover the mouse over the icon to read more about the preset type.
The three main types:
- "Fixed playing style": reproduces a certain playing style.
- "Generative": can sound completely different for different chord progressions.
- "Hybrid": contains aspects of the two other types.
Exporting presets
You can find a MIDI preview area on the right side of each preset. It displays the notes to give you a quick overview of the generated notes.
Drag and drop this MIDI area to your DAW to export the preset as a standard MIDI file. If your DAW doesn't support drag and drop, you can drag the MIDI file to an open Explorer window (Windows) or Finder window (macOS).
Not all presets will have the same length as your original chord progression. Some might be longer because the preset needs more time for melodic changes, modulations, or embellishments. The generated output will have the same meter as the original chord progression.
The Live Mode
SongEngine also supports real-time MIDI input. Instead of creating MIDI clips first, you can play chords live on your MIDI keyboard and let SongEngine transform them into new phrases instantly.
To activate Live Mode:
- Open the Packages page.
- Click on Live mode.
- Play chords on your MIDI keyboard.
SongEngine will immediately generate new MIDI notes based on the selected preset.
You are not limited to live playing. You can also send MIDI chords from your DAW through SongEngine, making it easy to audition different playing styles while composing.
MIDI Recorder
Live Mode contains a built-in MIDI recorder.
Whenever your DAW is running, SongEngine records all generated output notes automatically. When playback stops, recording stops as well.
You can then drag the recorded MIDI clip directly into your DAW for further editing.
Note: Unlike the standard Packages mode, Live Mode does not support drag-and-drop from the individual preset thumbnails. Instead, the thumbnails display preview images of the generated patterns.
Routing MIDI to another synth
When using the VST version of SongEngine, you can route the generated MIDI notes directly to another instrument plug-in. This allows SongEngine to control any synth in real time.
See the Routing MIDI output to another synth section for DAW-specific setup instructions.
Live Mode input modes
Click the Settings icon to choose how SongEngine interprets your keyboard input.
Mode: Chords
This is the default mode.
Simply play chords on your MIDI keyboard. SongEngine analyzes the played notes and generates new phrases, arpeggios, or rhythms based on the selected preset.
Mode: Chords with bass
This mode works similarly to the standard Chords mode, but additionally expects a dedicated bass note for every chord.
It is particularly useful when working with inversions or slash chords, since SongEngine can clearly identify which note should be treated as the bass.
Mode: One finger chords (Chords timeline)
This mode lets you trigger an entire chord progression with only one finger.
The chords are taken from the Chords timeline.
The mapping is straightforward:
- C triggers the first chord.
- D triggers the second chord.
- E triggers the third chord.
- and so on (C# = 8th chord, D# = 9th chord,...).
This is useful when you want to perform an existing chord progression live without playing every chord manually.
Mode: One finger chords (Chord Pads)
Instead of using the chord timeline, this mode uses the Chord Pads as the input source.
Each white key triggers one Chord Pad:
- C triggers the first pad.
- D triggers the second pad.
- E triggers the third pad.
- and so on (C# = 8th chord, D# = 9th chord,...).
Since Chord Pads can be filled manually, loaded from collections, or generated automatically, this mode is extremely flexible.
For example, when using the Main scale chords generator, SongEngine automatically fills the pads with the most important chords of the selected scale. Changing the associated scale immediately updates the available chords.
This provides a simple way to play all important chords of a scale with only one finger.
Other Live Mode settings
Two quantize modes are available:
- 8th notes quantize (default)
- Off
The default mode helps keep your performance rhythmically aligned with your DAW.
However, some presets—especially those that simply reproduce full chords—are intended to follow your playing exactly. In these situations, set Quantize to Off to preserve the original timing of your performance.
Tips and tricks
Fixed input velocity
Normally, SongEngine uses the velocity of the incoming MIDI notes.
If you prefer consistent dynamics, you can enable a fixed input velocity. This is especially useful when using very sensitive MIDI keyboards.
Important notes
- While scrolling through the preset list during playback, SongEngine temporarily pauses playback until new notes are played. This happens because the plug-in generates preview images for newly visible presets.
- In Live Mode, the recorder is the primary way to export generated MIDI. Individual preset drag-and-drop is disabled in this mode.
Working with song parts
You can find the song parts area at the top. Initially, there is only one song part visible ("Verse"). You can do a double click to rename it.
Click on a "+" sign to duplicate a song part. Do a right-click to delete a song part or rename it.
The different song parts are completely independent from each other. You can create new chord progressions if you like, or you can simply use the same chord progression and test different presets in the "Packages" view.
Routing MIDI output to another synth
If you use the VST version, you can route the generated notes to another synth via MIDI.
You can find instructions for different DAWs here (simply use SongEngine instead of ChordPotion ;).
Attention: The AU version doesn't support this feature. AU components can either operate as an audio plug-in or as a MIDI plug-in, but not as both.
Keyboard shortcuts
- Chords View:
- Toggle flow mode: "f".
- Trigger Chord Pads: Use 1 to 9 for the first nine pads. Hold down "0" to activate the second Chord Pad row.
- Switch between chords on timeline: Left arrow, right arrow.
- Invert active chord on timeline up or down: Up arrow, down arrow.
- Switch between Chord Pad Collection Pages: Ctrl (Windows) or Cmd (Mac) + 1/2/3/4.
- Delete active chord: Del or Backspace.
- Packages View:
- Switch between presets: Up arrow, down arrow.
Frequently asked questions
Will SongEngine melodies always sound the same?
You can read more about this here.
On how many computers can I use my add-on/extension licenses?
You can use your licenses on as many computers as you like (as long as these computers belong to you). No need to uninstall anything when you switch to a new computer :). You can also use the same licenses for both macOS and Windows.
I purchased Engine plug-ins before SongEngine was available. Do I need to purchase them again?
No, you don't have to buy anything again! SongEngine includes the content of the other Engines as well.
In most cases, SongEngine will automatically detect your existing licenses. If that doesn't happen, you can enter your serial numbers manually on the "Add More" page in SongEngine.
Once a license has been recognized, the corresponding Engine will display a "Registered (Complete)" badge on the "Add More" page.
Can I run it on Linux?
While there is no official Linux build (and probably never will), I have been told that it works fine with Wine. It might be a good idea to use yabridge as well then (use at least Wine Staging 9.21 to make this work).
What is the best way to create an own Chord Pad Collection quickly?
Try this:
- Create a MIDI chord progression in your DAW.
- Import it in SongEngine. Make sure that the "Associated scale" is correct.
- Click on "More" (to the right of the Pad Source field) and choose "Replace pads with chords in timeline". Then click on "More" again and choose "Save pads...".
You can also use the built-in mass converter to convert an entire folder (+ all direct subfolders) of MIDI chord progressions to Chord Pad Collections. You can find the mass converter here: Chords Page -> "More"-button at the bottom right -> "Convert MIDI files to Chord Pad Collections". The resulting files will be available in the "Own" folder of the Pad Source menu. To define the scale of a progression, add it in brackets at the end of the filename. For example, "test (C).mid" is interpreted as C major, while "test (Am).mid" is treated as A minor.